In the previous post I went over the basics of choosing, cleaning and making a hole in your egg.
Now what?
You’ve made the hole in the bottom. Good. Now turn the egg over. Don’t worry, it won’t come gushing out (unless you’ve got a rotten egg. Ew.) The viscous albumin and yolk have a tendency not to come out unless prompted.
You’re about to prompt it.

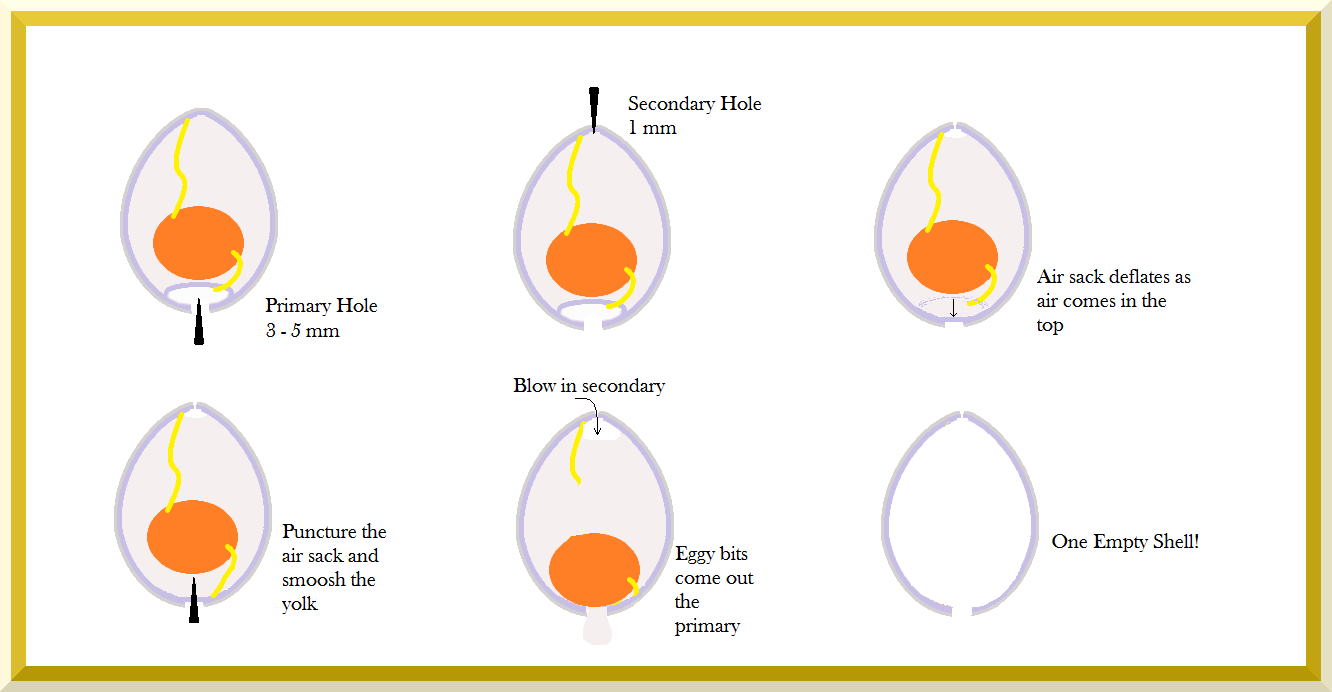
Using your stylus, insert a wee hole in the top. Wee being little. Tiny. Just enough to let air from this side of the shell onto the other side of the shell. You’ll need to go far enough to puncture the membrane layer on the inside of the shell. Don’t worry, that’s pretty thin.
I generally use the top as the ‘display’ side of my egg, so a small hole is disireable. If you intend to pass a ribbon through it, make it large (5mm), otherwise keep it tiny.
Now there’s one last thing you’ll need to do: Puncture the air-sack. Insert your stylus into the bottom of the egg, all the way in, and twirl it, shredding the thin membrane. This will now allow the contents to pass through the primary aperture.
Holding the egg firmly (but gently) in your hand, fingers and thumb either side of the primary hole. Hold the bottom end over the clean bowl and press your lips to the (wee) secondary hole.
Blow.
This is why it’s called blowing an egg. Make a good seal with your lips around the hole. It might help to wet it a bit with water. Ease the pressure on and apply it constantly. It’s hard to see what’s happening, but here’s a clue:
The thick, viscous albumin will be working its way out the hole. There will be bits of tough membrane getting in the way, but by and large you’ll notice a clear drip form on the bottom of your egg. That’s good. Keep ‘blowing’.
Little by little that drip will grow larger, and form a smooth drop that will land into your bowl. Good. Keep blowing.
If you’ve mushed it with your stylus right, there’ll be a constant thick stream running out the bottom as you blow. You’ll notice the contents will go from albumin, to yolk, to albumin once more as each phase is pushed through the hole. Good. Keep blowing.
Keep blowing until the egg is light, the air from your mouth is whistling out the other end. Good job!
Troubleshooting
It seldom goes as smoothly as this, unless you’ve made a whopper of a primary hole. Things that can go wrong:
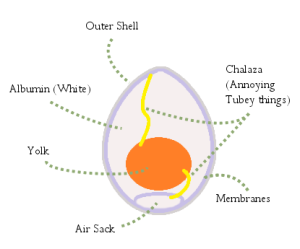
- The hole is small, and the annoying little tubey things are wedged in there – use your stylus, tweezers or fingers to pull them through.
- The hole is too large, and the egg is cracking under the internal pressure – Blow more gently. Apply only enough pressure to keep the fluid moving.
- Nothing it coming out, no matter how hard your blow – You may not have punctured the air sack at the bottom, or your secondary hole hasn’t gone deep enough.
- You’ve got a bowl of albumin, no yolk and nothing’s coming out – The yolk has a thin, but surprisingly strong, membrane around it. Jab your stylus through the primary hole and keep blowing.
I find the little tube thing that gets in the way is my most common problem. It’s generally “Blow, blow, blow, stop, get a grasp on the chalaza, draw it out, crud it broke, blow, found it again, draw it out gently this time, good, blow, blow, blow, done.”
Clean up
You’ve got a bowl of egg insides, an empty shell and a smile on your face. Wash off the residual goop around the primary hole, and then wash the insides of the egg. How? Well, you know how the egg shell is effectively a straw?
Pool some water in a dish or in your hand and, rather than blow the secondary hole, suck the water up into the egg. When the egg is half full of water, slosh it around good, then blow the water back out again. Repeat a couple of times and then stand up to let the water drain and dry.
Don’t like that idea? OK. Get some running water on a needle thin stream, hold the egg upside down and let the stream trickle into the primary hole. Not as fast or as effective, but I’ve tried it and it still works.
Up next, some advanced tips and tricks.


