You’ve blown a batch of eggs. That’s a great start. They’re washed and dried and ready for use. Now, the question comes: What to do with them?
Eggs are a really wonderful canvas. They are porous, so they will happily absorb all manner of pigments. They are rigid, so pencils and paint and ink works just fine. They are hard, so you can drill them to insert crystals or ornaments. They respond to acid etching. You can glue things to them, or cut holes out of them, or wrap them in material.
Let’s start with painting…
To turn your brown egg shell into a nice, white canvas, you’ll need to get some undercoat. This will seal the egg, adding a little strength to it at the same time, and provide an excellent substrate onto which you can paint.
I use a matte white water based undercoat for my eggs – Dulux 1-Step. I bought half a liter of the stuff yonks back and break it open before each Easter, and I’ve barely made a dent in it.
I use water based instead of oil based because:
- It dries real quick, so I can do a few coats in one night.
- It doesn’t pong as bad.
- It cleans up real easy. Wash out with water, and you’re done.
- A lot of the mediums and overcoats I use are also acrylic.
I did try oil based paints a while back, and they give a good, strong finish, but I can achieve similar results with acrylics with a lot less fuss.
Line your eggs up on your work area, dedicating one tripod to each egg. You’ll want somewhere to put them down after each coat. Don’t forget to put some newspaper down if you’re working on the kitchen table.
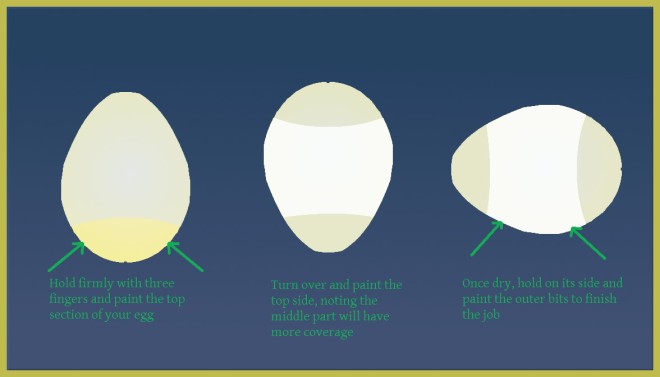
Choose a 1″ or 3cm paint brush, hold your egg as shown below and get painting!
Tips and Tricks
- A better finish is achieved if you apply multiple thin coats rather than one thick coat. It’s smoother, it looks more even and you don’t end up with runs and drips.
- Unless you’re insanely skilled, you won’t be able to paint the egg at the point where you’re holding it. Don’t worry, alternate you grip on the next coat as in the diagram above.
- If you want an uber-smooth egg to paint on, consider sandpapering some of the little lumps on the egg before you undercoat (grinding with the Dremel also helps with this).
- Between coats, if you can be fluffed, give a bit of a light buff with steel wool to smooth out the painting.
- Aim for a minimum of two coats, preferably three.
- Don’t be too concerned if you can still see the colour of the egg through the paint, since this is just the undercoat. Your pattern will take care of that.
- If you want some of the real egg to show through, or only want to paint a certain area (like when you’re making a silhouette), use masking tape, sticky dots or any other sticking shape to mask the non-painted regions.
- Aim to fill the secondary (top) hole with paint. If it’s small enough, it will close over nicely. You might not be able to totally close the primary hole, but that’s ok, we can work on that later.
- Once you’ve finished one part of the paint, put the egg back onto the pizza tripod to dry.
- Don’t let animals or kiddies come near your precious eggs. Not yet, anyway.
I’ve seen some techniques that advocate inserting a wire through the egg to allow you to paint it. I personally don’t, since it tends to weaken the egg and enlarge the hole. One part of preparation is strengthening the egg and reducing the hole!
By the end of all of this, you’ll have a carton of egg shells just waiting to be decorated! Now comes the fun part, actually making a design!


