

The last post yammered on about how cool Synfig is. For a dude like me who hasn’t the training, the cash or the patience for the professional stuff, it does the job admirably and there’s a whack of stuff in there that I haven’t even had the chance to look at yet.
Enough already!
Alright, alright, I’m getting to it. With my vector images ready to go and a little practice under my belt, I was ready to try and get a scene in motion. I started by importing the svg into Synfig. Go to File > Import and select your file (you can use this to bring in jpg and png images as well). This will make a group layer that contains a bunch of other layers, one for each layer in the original file, and inside each of those is a layer for each path.

If you’ve labeled your layers in Inkscape, they won’t have these labels when imported into Synfig. No worries, just spend a minute to select and re-label those layers – a stitch in time and all of that.
Now, one issue I did come across was that regions that had bits that had been subtracted (I’m talking annuli, doughnuts, holes, cutouts) still had the paths present, but they hadn’t been subtracted, like you can see in the image on the left.
The Worker’s glass and head brace naturally wanted to allow him to be able to see the Bullet as it goes past. Only thing is, the import left the cutout as the same colour and composition style as the rest of the headgear, so I ended up with a blast shield over the lenses.

One workaround for this, I found, was to select the layer that was to be the cutout, and set its composition to subtract the alpha from the underlying region. This will mimic the hole punch effect of one region upon another.
To add a little bit of depth, I also took the opportunity to add in a ‘lens’ layer, merely a circle that colourised everything beneath it, so as to give the skin and eyes an unnatural, soft, blue hue.
So there’s a little bit of tidying up that needs to be done when bringing in your SVGs, but it’s not a killer and it also gives you a chance to get everything prepped, and also, more importantly perhaps, the incentive to fiddle around with the settings to see what flies.
Animate it !
Synfig lets you animate properties of your layers, and these can be done by adding waypoints for these properties. The various styles of your waypoints affect how the engine calculates the resulting points in between your waypoints. Each of these can have a different style for in and out. For example, you can use a ‘Linear’ waypoint (the yellow one) to linearly transition from one state to another. Alternatively, you can choose for a more flowing ‘Clamped’ to give a smoother lead in or out. There’s also TCB which is pretty cool but hard to control.
 There’s also the step or constant which you can use to instantly transition a state, which comes in handy when you want to make something, say, disappear or reappear or change from one colour to another in the blink of an eye. The best way to figure these out is to muck around with them and get a feel for how they behave.
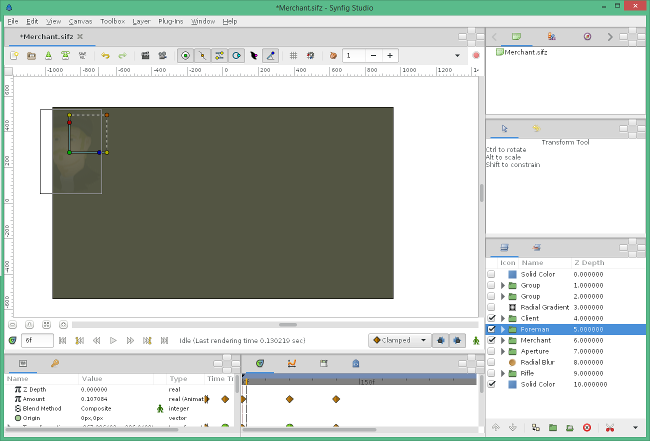
One of my scenes that I decided upon was to have my characters zooming in from the sides, scaling from little to really big, and fading in from invisible to visible and invisible again. I’ll pick on the Foreman to give you an example. I’ve taken a shot just a frame or two after my first waypoint so you can get a feel for where he starts off: Top left, barely visible and tiny.
With the little man set to green, I prime my layer to be where I want it to be at the start.
 Then, I click on the green man to turn him red. This means I’m in ‘animating’ mode, and I can create waypoints. Moving the timeline forward to an applicable spot, I can drag the balls on the graphical layer to position it where I want it to be at this time. This will create a waypoint for the position.
You can see these waypoints in the bottom panel. Each will have a graphic for the ‘in’ portion and one for the ‘out’. So you can, for example, linearly transition something in, then apply a constant on the out.
To change a waypoint, you can drag it left or right to set the frame, or right click to alter the type of in/out/both, or duplicate it, remove it, etc. Notice, too, that the waypoints are inline with the properties that they are animating. In the example there, the Amount (think opacity) is animated with clamped points from 0.0 to 1.0 and back down to 0.0 again to fade in and fade out. The Transformation (position, scale, rotation) can have a completely separate set of waypoints to follow.
 To resize or rotate or move the layer, you can just grab the little balls on the screen, or if you want precise control, you can set the numeric value directly in the property – value window on the bottom left. This is handy if you want to perform precise motion, like the rotation of gears or the path of a conveyor belt.
This is how I got the bulk of my animation covered, but there are still some facets that I’d like to cover, namely animating paths or object within other objects, as independent entities.
Say what? Just bear with me, it’ll make sense in the next post.